- 2017-3-20
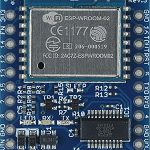
- ESP-WROOM-02
- コメントを書く
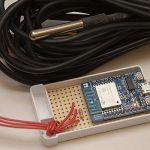
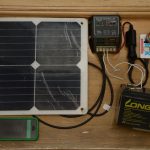
ESP-WROOM-02開発ボードを単三電池3本で長期に運用するのが目的。
今回は温湿度・気圧センサーのBME280を使用し、ESP-WROOM-02開発ボードの低消費電力モード「Deep-Sleep」モードを試してみた。
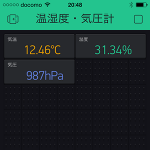
スマホでの温度表示はBlynkです。
配線図

IO16ピンをRST端子に接続しておくことがDeep-Sleepモードからの復帰のためには必要です。
Aruduino IDEでスケッチ書き込み時に16ピンとRSTが接続されているとエラーになるので、ジャンパーピン等を利用して書き込み時に外せる様にすると良いでしょう。
乾電池はVINに接続します。
118行目で設定した時間でDeep-Sleepモードから復帰します。
ESP.deepSleep(300 * 1000 * 1000);
↑赤字部分
今回は300秒で設定しました。
1 2 3 4 5 6 7 8 9 10 11 12 13 14 15 16 17 18 19 20 21 22 23 24 25 26 27 28 29 30 31 32 33 34 35 36 37 38 39 40 41 42 43 44 45 46 47 48 49 50 51 52 53 54 55 56 57 58 59 60 61 62 63 64 65 66 67 68 69 70 71 72 73 74 75 76 77 78 79 80 81 82 83 84 85 86 87 88 89 90 91 92 93 94 95 96 97 98 99 100 101 102 103 104 105 106 107 108 109 110 111 112 113 114 115 116 117 118 119 120 121 122 123 124 125 126 127 128 129 130 131 132 133 134 135 136 | /************************************************************** * Blynk is a platform with iOS and Android apps to control * Arduino, Raspberry Pi and the likes over the Internet. * You can easily build graphic interfaces for all your * projects by simply dragging and dropping widgets. * * Downloads, docs, tutorials: http://www.blynk.cc * Blynk community: http://community.blynk.cc * Social networks: http://www.fb.com/blynkapp * * Blynk library is licensed under MIT license * This example code is in public domain. * ************************************************************** * This example runs directly on ESP8266 chip. * * You need to install this for ESP8266 development: * * Please be sure to select hte right ESP8266 module * in the Tools -> Board menu! * * Change WiFi ssid, pass, and Blynk auth token to run :) * **************************************************************/#define BLYNK_PRINT Serial // Comment this out to disable prints and save space#include <ESP8266WiFi.h>#include <BlynkSimpleEsp8266.h>#include <BME280_MOD-1022.h>#include <Wire.h>#define WakeMode RFMode#define WAKE_RF_DEFAULT RF_DEFAULT#define WAKE_RFCAL RF_CAL#define WAKE_NO_RFCAL RF_NO_CAL#define WAKE_RF_DISABLED RF_DISABLED// You should get Auth Token in the Blynk App.// Go to the Project Settings (nut icon).char auth[] = "fromBlynkApp"; //Blynkで生成されるAuth Tokenunsigned long lastCheck = 0;double tempMostAccurate, humidityMostAccurate, pressureMostAccurate;char buff[50];// Arduino needs this to pring pretty numbersvoid printFormattedFloat(float x, uint8_t precision) { char buffer[10]; dtostrf(x, 7, precision, buffer); Serial.print(buffer);}void deepSleep(uint32_t time_us, RFMode mode = RF_DEFAULT); void setup(){ Serial.begin(115200); Blynk.begin(auth, "SSID", "password"); //無線ルーターのSSIDとパスワード Wire.begin(); pinMode(12, OUTPUT); // need to read the NVM compensation parameters BME280.readCompensationParams(); BME280.writeStandbyTime(tsb_0p5ms); // tsb = 0.5ms BME280.writeFilterCoefficient(fc_16); // IIR Filter coefficient 16 BME280.writeOversamplingPressure(os16x); // pressure x16 BME280.writeOversamplingTemperature(os2x); // temperature x2 BME280.writeOversamplingHumidity(os1x); // humidity x1 BME280.writeMode(smNormal);}void formattedFloat(float x, uint8_t precision, char *buff) { dtostrf(x, 7, precision, buff);}BLYNK_READ(V0) { tempMostAccurate = BME280.getTemperatureMostAccurate(); Serial.print("Temp "); printFormattedFloat(tempMostAccurate, 2); Serial.println(); formattedFloat(tempMostAccurate, 2, buff); Blynk.virtualWrite(V0, buff);}BLYNK_READ(V1) { humidityMostAccurate = BME280.getHumidityMostAccurate(); Serial.print("humid "); printFormattedFloat(humidityMostAccurate, 2); Serial.println(); formattedFloat(humidityMostAccurate, 2, buff); Blynk.virtualWrite(V1, buff);}BLYNK_READ(V2) { pressureMostAccurate = BME280.getPressureMostAccurate(); Serial.print("pressure "); printFormattedFloat(pressureMostAccurate, 2); Serial.println(); formattedFloat(pressureMostAccurate, 2, buff); Blynk.virtualWrite(V2, buff);ESP.deepSleep(300 * 1000 * 1000);}void loop(){ Blynk.run(); int diff = millis() - lastCheck; if (diff > 1000) { while (BME280.isMeasuring()) { } // read out the data - must do this before calling the getxxxxx routines BME280.readMeasurements(); lastCheck = millis(); } else if (diff < 0) { lastCheck = 0; }} |

この記事の著者
この著者の最新の記事

関連記事
コメント
この記事へのトラックバックはありません。
この記事へのコメントはありません。