- 2017-3-20
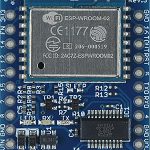
- ESP-WROOM-02
- コメントを書く
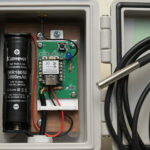
ESP-WROOM-02開発ボードを単三電池3本で長期に運用するのが目的。
今回は温湿度・気圧センサーのBME280を使用し、ESP-WROOM-02開発ボードの低消費電力モード「Deep-Sleep」モードを試してみた。
スマホでの温度表示はBlynkです。
配線図

IO16ピンをRST端子に接続しておくことがDeep-Sleepモードからの復帰のためには必要です。
Aruduino IDEでスケッチ書き込み時に16ピンとRSTが接続されているとエラーになるので、ジャンパーピン等を利用して書き込み時に外せる様にすると良いでしょう。
乾電池はVINに接続します。
118行目で設定した時間でDeep-Sleepモードから復帰します。
ESP.deepSleep(300 * 1000 * 1000);
↑赤字部分
今回は300秒で設定しました。
/**************************************************************
 * Blynk is a platform with iOS and Android apps to control
 * Arduino, Raspberry Pi and the likes over the Internet.
 * You can easily build graphic interfaces for all your
 * projects by simply dragging and dropping widgets.
 *
 *   Downloads, docs, tutorials: http://www.blynk.cc
 *   Blynk community:            http://community.blynk.cc
 *   Social networks:            http://www.fb.com/blynkapp
 *                               http://twitter.com/blynk_app
 *
 * Blynk library is licensed under MIT license
 * This example code is in public domain.
 *
 **************************************************************
 * This example runs directly on ESP8266 chip.
 *
 * You need to install this for ESP8266 development:
 *   https://github.com/esp8266/Arduino
 *
 * Please be sure to select hte right ESP8266 module
 * in the Tools -> Board menu!
 *
 * Change WiFi ssid, pass, and Blynk auth token to run :)
 *
 **************************************************************/

#define BLYNK_PRINT Serial    // Comment this out to disable prints and save space
#include <ESP8266WiFi.h>
#include <BlynkSimpleEsp8266.h>
#include <BME280_MOD-1022.h>
#include <Wire.h>

#define WakeMode RFMode
#define WAKE_RF_DEFAULT  RF_DEFAULT
#define WAKE_RFCAL       RF_CAL
#define WAKE_NO_RFCAL    RF_NO_CAL
#define WAKE_RF_DISABLED RF_DISABLED

// You should get Auth Token in the Blynk App.
// Go to the Project Settings (nut icon).
char auth[] = "fromBlynkApp"; //Blynkで生成されるAuth Token

unsigned long lastCheck = 0;
double tempMostAccurate, humidityMostAccurate, pressureMostAccurate;
char buff[50];

// Arduino needs this to pring pretty numbers

void printFormattedFloat(float x, uint8_t precision) {
  char buffer[10];

  dtostrf(x, 7, precision, buffer);
  Serial.print(buffer);
}

void deepSleep(uint32_t time_us, RFMode mode = RF_DEFAULT);

void setup()
{
  Serial.begin(115200);
  Blynk.begin(auth, "SSID", "password"); //無線ルーターのSSIDとパスワード
  Wire.begin();
  pinMode(12, OUTPUT);

  // need to read the NVM compensation parameters
  BME280.readCompensationParams();

  BME280.writeStandbyTime(tsb_0p5ms);         // tsb = 0.5ms
  BME280.writeFilterCoefficient(fc_16);       // IIR Filter coefficient 16
  BME280.writeOversamplingPressure(os16x);    // pressure x16
  BME280.writeOversamplingTemperature(os2x);  // temperature x2
  BME280.writeOversamplingHumidity(os1x);     // humidity x1

  BME280.writeMode(smNormal);
}

void formattedFloat(float x, uint8_t precision, char *buff) {
  dtostrf(x, 7, precision, buff);
}

BLYNK_READ(V0)
{
  tempMostAccurate = BME280.getTemperatureMostAccurate();

  Serial.print("Temp ");
  printFormattedFloat(tempMostAccurate, 2);
  Serial.println();

  formattedFloat(tempMostAccurate, 2, buff);
  Blynk.virtualWrite(V0, buff);
}

BLYNK_READ(V1)
{
  humidityMostAccurate = BME280.getHumidityMostAccurate();

  Serial.print("humid ");
  printFormattedFloat(humidityMostAccurate, 2);
  Serial.println();


  formattedFloat(humidityMostAccurate, 2, buff);
  Blynk.virtualWrite(V1, buff);
}

BLYNK_READ(V2)
{
  pressureMostAccurate = BME280.getPressureMostAccurate();

  Serial.print("pressure ");
  printFormattedFloat(pressureMostAccurate, 2);
  Serial.println();

  formattedFloat(pressureMostAccurate, 2, buff);
  Blynk.virtualWrite(V2, buff);

ESP.deepSleep(300 * 1000 * 1000);
}

void loop()
{
  Blynk.run();

  int diff = millis() - lastCheck;
  if (diff > 1000) {
    while (BME280.isMeasuring()) {

    }
    // read out the data - must do this before calling the getxxxxx routines
    BME280.readMeasurements();
    lastCheck = millis();
  } else if (diff < 0) {
    lastCheck = 0;
  }
}

この記事の著者
この著者の最新の記事

関連記事


コメント
この記事へのトラックバックはありません。
この記事へのコメントはありません。